Another Story on How Those Lost Mines Stories Got Started
Hi Tom,
Glad you thought those stories were useful and no problem letting others know how and where a lot of those come from.
Mary just reminded me of one more and I know you will like this one.
A fellow from the area belonged to the local mineral club and they told him I was a good source to help identify things. We became friends over a number of visits. He loved getting out and looking for mines in the area. He lived over by Pearce, an old mining town still in the area.
One time he asked if I would go with him to look for a mine in the Cochise Stronghold of the Dragoon Mountains.
He had been told of a mine up in one canyon and had gone up looking for it but didn’t find it and wanted to see if I would go with him and use my better mine eye to find it.
We drove up to Cochise Stronghold and parked and then took the one trail he said the mine was supposed to be up. From what he had been told, the mine was high up toward the ridge near the top and there was a nice hole with ore on the dumps. We hiked and it was a pretty day and a very steep area. The trail finally played out and went off to a different area and he said he had been told the mine was up the canyon toward the top of where we were standing. The area was very steep and none of the rock I had gone past looked like it could have a mine, let alone a gold mine like he had been told.
We finally came to a steep waterfall area that had no easy way past it without equipment. We sat down on the rocks and just looked at the nice view. We had seen nice wildlife and plenty of great views but no mine.
This was when my friend told me where he had heard about this. As soon as he said it was an old Apache Woman that lived down in the canyon I let my eyes roll back in my head and knew right away what had taken place. My wife is part Apache and she had told me often of the stories the Apaches had told the white man, as they used to call us import peoples. The old woman had told my friend a story and for some odd reason, he had bought into it. The woman said that the story of the Lost Dutchman’s mine was all a hoax by the Indians to get a lot of white men out looking for it and then die in the rough and unforgiving terrain.
She told my friend that the Lost Dutchman mine was actually a mine toward the top of the Dragoon Mountains and the Indians had told the story of it being in the Superstition Mountains to fool people into not looking where it “really” was, here in Cochise Stronghold. I was ticked at him for having dragged me on a total wild goose chase and remarked that the old lady had gotten back a bit at a stupid white man to go looking for a total story that she had made up.
All I could tell him was that at least it was a pretty day and a good day for a hike but I also informed him that I would never join him on any of his wild goose chases again. I told Mary of the whole tale and she agreed, the woman had found another sucker to go on chasing for gold.
There are a ton of these stories and you are welcome to use this any way you like.
In retrospect it was kind of a funny situation and he did say that he didn’t want to tell me before we went up on the mountain because he knew how I would react, he was right, I never would have gone if I had known where the story came from.
Rolf
—
Bob Ward spent 30 years in the Superstition looking for the Old Dutchman Mine and his theories (or mad guesses) are still in print.
My investigation of that area has somewhat stalled.
I was hoping that the fluorescent properties of alunite might guide me to that mineral on the hill. It is said to be extremely difficult to identify using physical or chemical means. Unfortunately, further research says its UV characteristics are uncertain.
The alunite examples I got from Minerals Unlimited are from Marysvale in Piute County, Utah. Mindat confirms that the mining district there indeed has alunite.
The host rock is richly pink, possibly from feldspar. The florescence the rocks show is confusing.
I read originally that alunite fluoresces orange under LW. Another website says it glows white under SW. Another authoritative site site says yellowish-white under both SW and LA. A hardcopy book I have says alunite is not normally a fluorescent mineral but when it does, it appears white to grayish.
The problem is that the specimens I receive glow softly green under SW and not at all under LW. Some of the rocks don’t light up at all. I have one rock from the hill that also lights up green under SW but it is much brighter than my reference samples and it has an afterglow. The ones from Utah do not.
Not all minerals are well researched for all the characteristics they may possess in all localities. For example, extremely few fluorescent mineral list mention that some benitoite glows red. But some small pieces do. UV may not be helpful after all but I have found a few other things lately in my self-quarantining.
I have Castor’s well respected Minerals of Nevada in my library. He says alunite is “abundant with pyrite at Railroad Pass.” Okay, as a gold prospector I certainly know what pyrite looks like. And two Nevada Bureau of Mines and Geology Examination reports mention quartz and alunite veins. Another mention of quartz. While I have found only one piece! Something is wrong.
In one of those examination reports are clear directions to another site on the hill, in the opposite direction of the area I was looking at. Armed with this information, I think I am now better positioned to find some well mineralized rocks. Just wished my back and leg were getting better.
I am now in physical therapy but and not making any progress, indeed, I having set backs. Still, I will probably make it back to the hill soon. Gold fever trumps all illnesses. Even when you are only looking for colors.
— https://www.instagram.com/tgfarley/ Follow me on Instagram: tgfarley
The folks at Baby Girl Mining continue working their ground in their latest video. They are finding more gold and more evidence of an ancient streamed as they encounter rolled rocks. This is real small scale miner stuff, not some wildly dramatic gold series you might find on cable TV or the exaggerated nonsense you get from many YouTubers. Good luck to them!
— https://www.instagram.com/tgfarley/ Follow me on Instagram: tgfarley
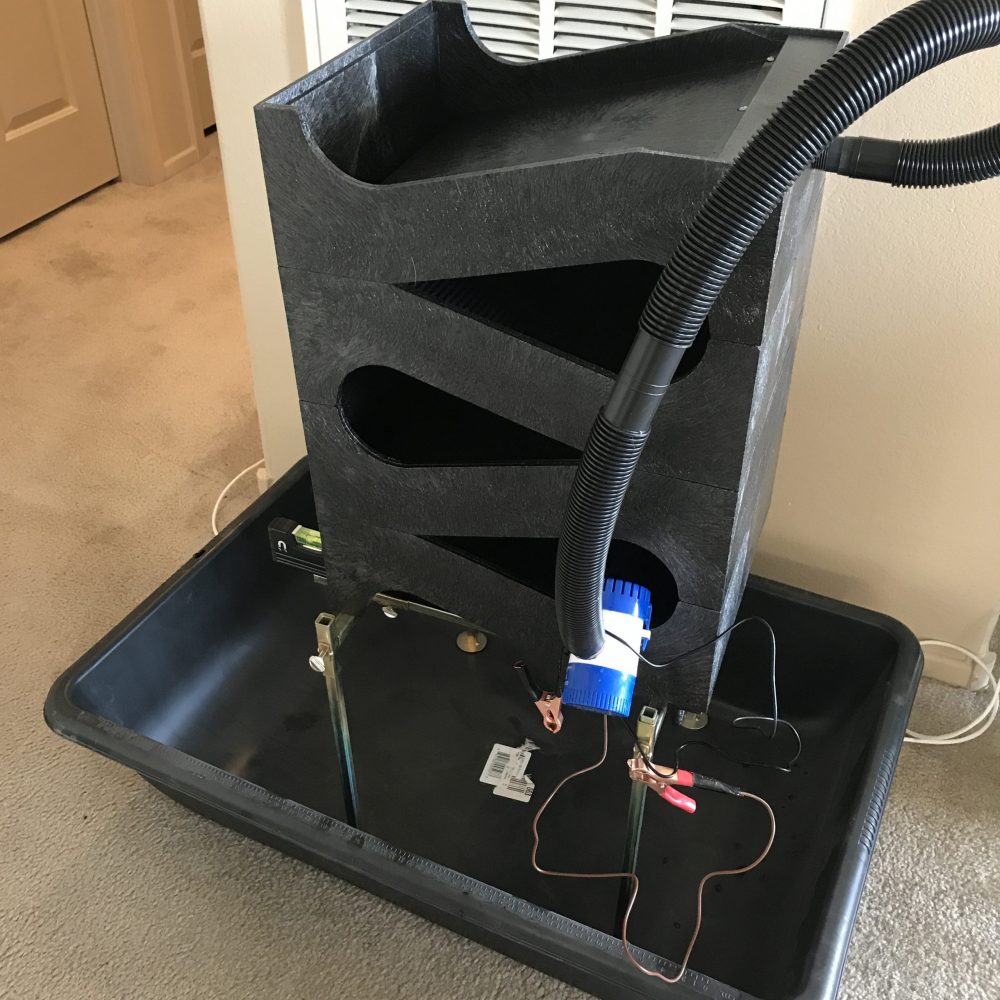
Part One here — — Ran the Gold Cube out on my apartment balcony yesterday. I used a about two pounds of sand from an Arizona location I found while traveling to Quartzsite. I spotted 10X gold in my pan in the concentrate that developed but I may have pulled a rookie move. I may not have thoroughly cleaned my gold pan before running this test. Leaving that mystery aside, some comments are in order.
First, this test was totally unfair to the Gold Cube. The material I had was simply scooped off the top of the ground, four or five trowel fulls and not classified at the site. Raw material, not concentrate. Later, I classified most of it to fifty mesh since I knew it was extremely fine gold. I had seen small bits of gold while I looked it in harsh direct sunlight but, again, very fine. The question was whether the Gold Cube could recover those tiny microdots. While I can’t be sure from this raw material, there are many, many other reasons why I like the Gold Cube very much.
I love the simplicity of the machine. No spray bar to mess with, no valve to adjust, just turn on and go. Compare this to setting a river or creek sluice in which I always pour screened or classified material. (I use a Le Trap sluice and I never shovel into it directly. Or the Keene models when I had them.) With a sluice, you have to find the right spot to begin with, never easy, anchor the silly thing, get the angle right, make sure the flow through is correct, adjust, and then adjust some more. And then you have to get the sluice out of the river without losing any values when it’s time for a cleanup. Not easy when you are by yourself. Compare that to the Gold Cube.
No ideal place on the river to find, no flow to adjust, no angles to set, no need for constant fine tuning. No problem with recovery for cleanups. Just get it level and proceed. It ate up my fifty mesh sand almost as quickly as I could feed it but I am sure it takes longer for bigger gravel. Whatever.
I am probably going to bring home concentrate from the desert rather than setting it up on a river. This will be a different experience than true field use so I won’t guess at how that might go. I might use it at a campground if there is a creek or faucet nearby to get enough water. Again, another day. That’s my overall impression of the Cube. Now, some details.
A word on weight. With the setup seen below, I was using about 18 gallons of water. That’s about 150 pounds. Throw in the Gold Cube at around 35 pounds and then a five to ten pound battery and you are looking at around 200 pounds. I mention this because my 13 year old balcony can easily support this weight. If your balcony or situation is much older, you should make sure it is structurally sound.
— The next photo shows me applying Jet Dry, something fairly common to matting material. A YouTuber advised to prep the Gold Cube’s fresh mats by brushing the liquid into the mat while at the time pressing hard to release any air in mats. The maker’s literature may contradict using chemicals. In any case, I kept brushing until no more air bubbles came out. — This is a seven dollar level from Home Depot that sticks very well to the frame. — — A look at the first or top tray which collects the bigger gravel and most of the gold if you are lucky to have some. — — Recommendation is to wash out each mat under pressure into a tub. Tried this with my camping shower head but it did not have enough force. — — Took all of the trays to my garden plot at one of the community gardens in my apartment complex. I don’t do much gardening, only five plants, but I am assured a hose and a place to washout everything I bring home from the hills. Used water under force to clean out the trays, each of which has a mat. —
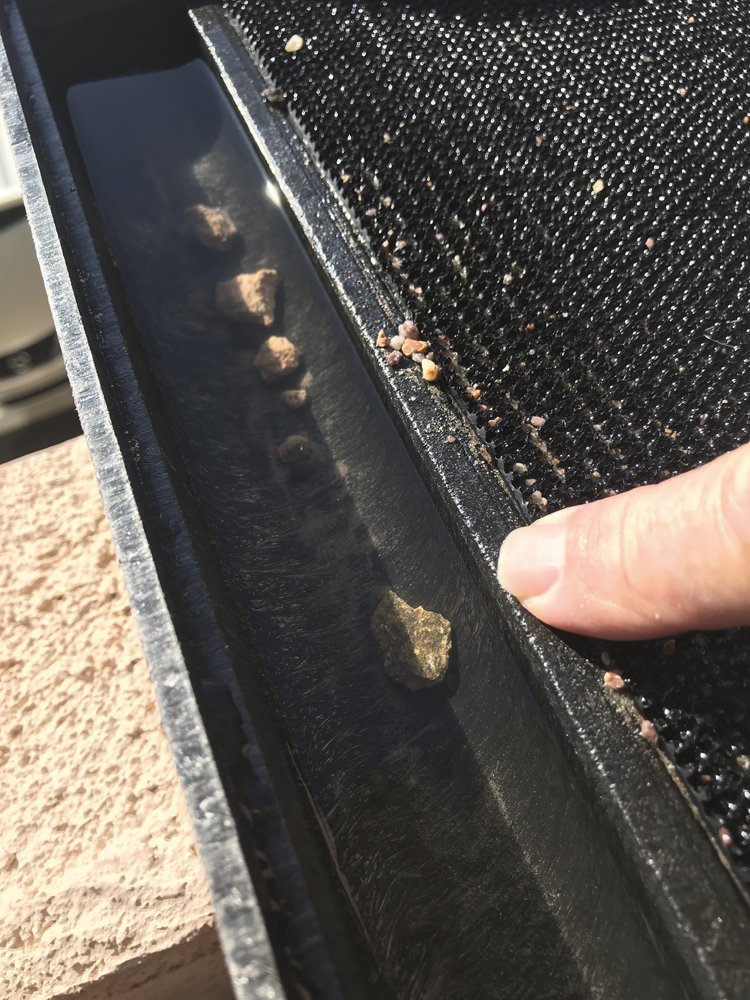
— This is the result. The Gold Cube is not a finishing machine, rather it is a super concentrator. To clean up this black sand you’d need a Blue Bowl, good luck with that, or some other means to collect all of your values. I prefer careful panning and then storing my placer gold for some time in the future. I never make money by panning or sluicing. I just collect. Now, back in the day, when I helped out with dredging, that was another story! — — Gold appeared under my 10X loupe in the pan but I couldn’t picture it with my scope. Anything glittering is incredibly difficult to photograph up close. The lights I need to photograph wash out the gold color, take away the lights and you can’t see the gold. Another project, another day.
Each tray looks similar so it may be easy to get confused when stacking them. In an extremely clever move, the maker has designed them so they only fit together when turned the right way. If your tray is not stacking properly then turn it around. It will then stack correctly. There’s just enough difference in the trays to prevent wrongly placing them. I kept trying to force one tray onto the top of another, needing only a quarter of an inch or so of stretching to make the tray fit. But this plastic does not stretch. Turning the tray around results in perfect placement. Correct stacking is crucial to making water flow through the machine. So engineered, you should be able to assemble the stack in the dark since they will only fit just so.
These two Gold Cube posts are just my first impressions of the machine. I do have a few pounds of paydirt from NorthernNevadaGold.com but I was planning on donating it to a rock club I belong to. Maybe I will break down and process it. Then again, I would much rather find my own sand and gravel and I do know a few spots I would like to investigate. Stay tuned.
Kevin Singel has a page on actually operating the Cube, both in the field and off. Great hints and tips:
https://findinggoldincolorado.com/using-a-gold-cube-in-colorado/ — The company that makes the Gold Cube is on eBay at goldcubeusa. For all you haters and trolls, this post is a non-sponsored recommendation! I pay for all of my equipment. And I pay extra for my web hosting to make sure there are no ads on my site. My videos are first done with Vimeo, a service that I pay for to make sure there are no ads on them. When they get published to Google there is nothing I can do. But I certainly don’t make money from them nor do I have any account set up with Google to get money from them. Now, go back to your basements.
https://www.ebay.com/usr/goldcubeusa?
Kevin Singel has a page on actually operating the Cube, both in the field and off. Great hints and tips:
Just bought a Gold Cube 4-stack Deluxe for processing concentrates. It’s a well reviewed product and information and videos about it all over the net. I bought directly from the manufacturer through eBay. Their eBay company name is goldcubeusa.
https://www.ebay.com/usr/goldcubeusa?
Kevin Singel has a page on actually operating the Cube, both in the field and off. Great hints and tips:
There is little involved in putting together the four trays which are made of tough plastic. Something called LPDE which you have probably seen but not recognized by that name. — — The stand was somewhat difficult to set up. The instructions have poor, dark photographs which I am sure will be revised. Now that I have it assembled, however, everything makes sense as to why it was designed that way.
The stand is made rigid by ten 1/4″ coarse thread thumbscrews. Get extras at most large hardware stores as you will lose them over time. My thumbscrews needed a little filing to make them finger friendly from some stray metal slivers. No big whoop. The Gold Cube must be level so I bought an eight dollar level at the Home Depot that attaches with its strong magnet to the stand.
Wiring
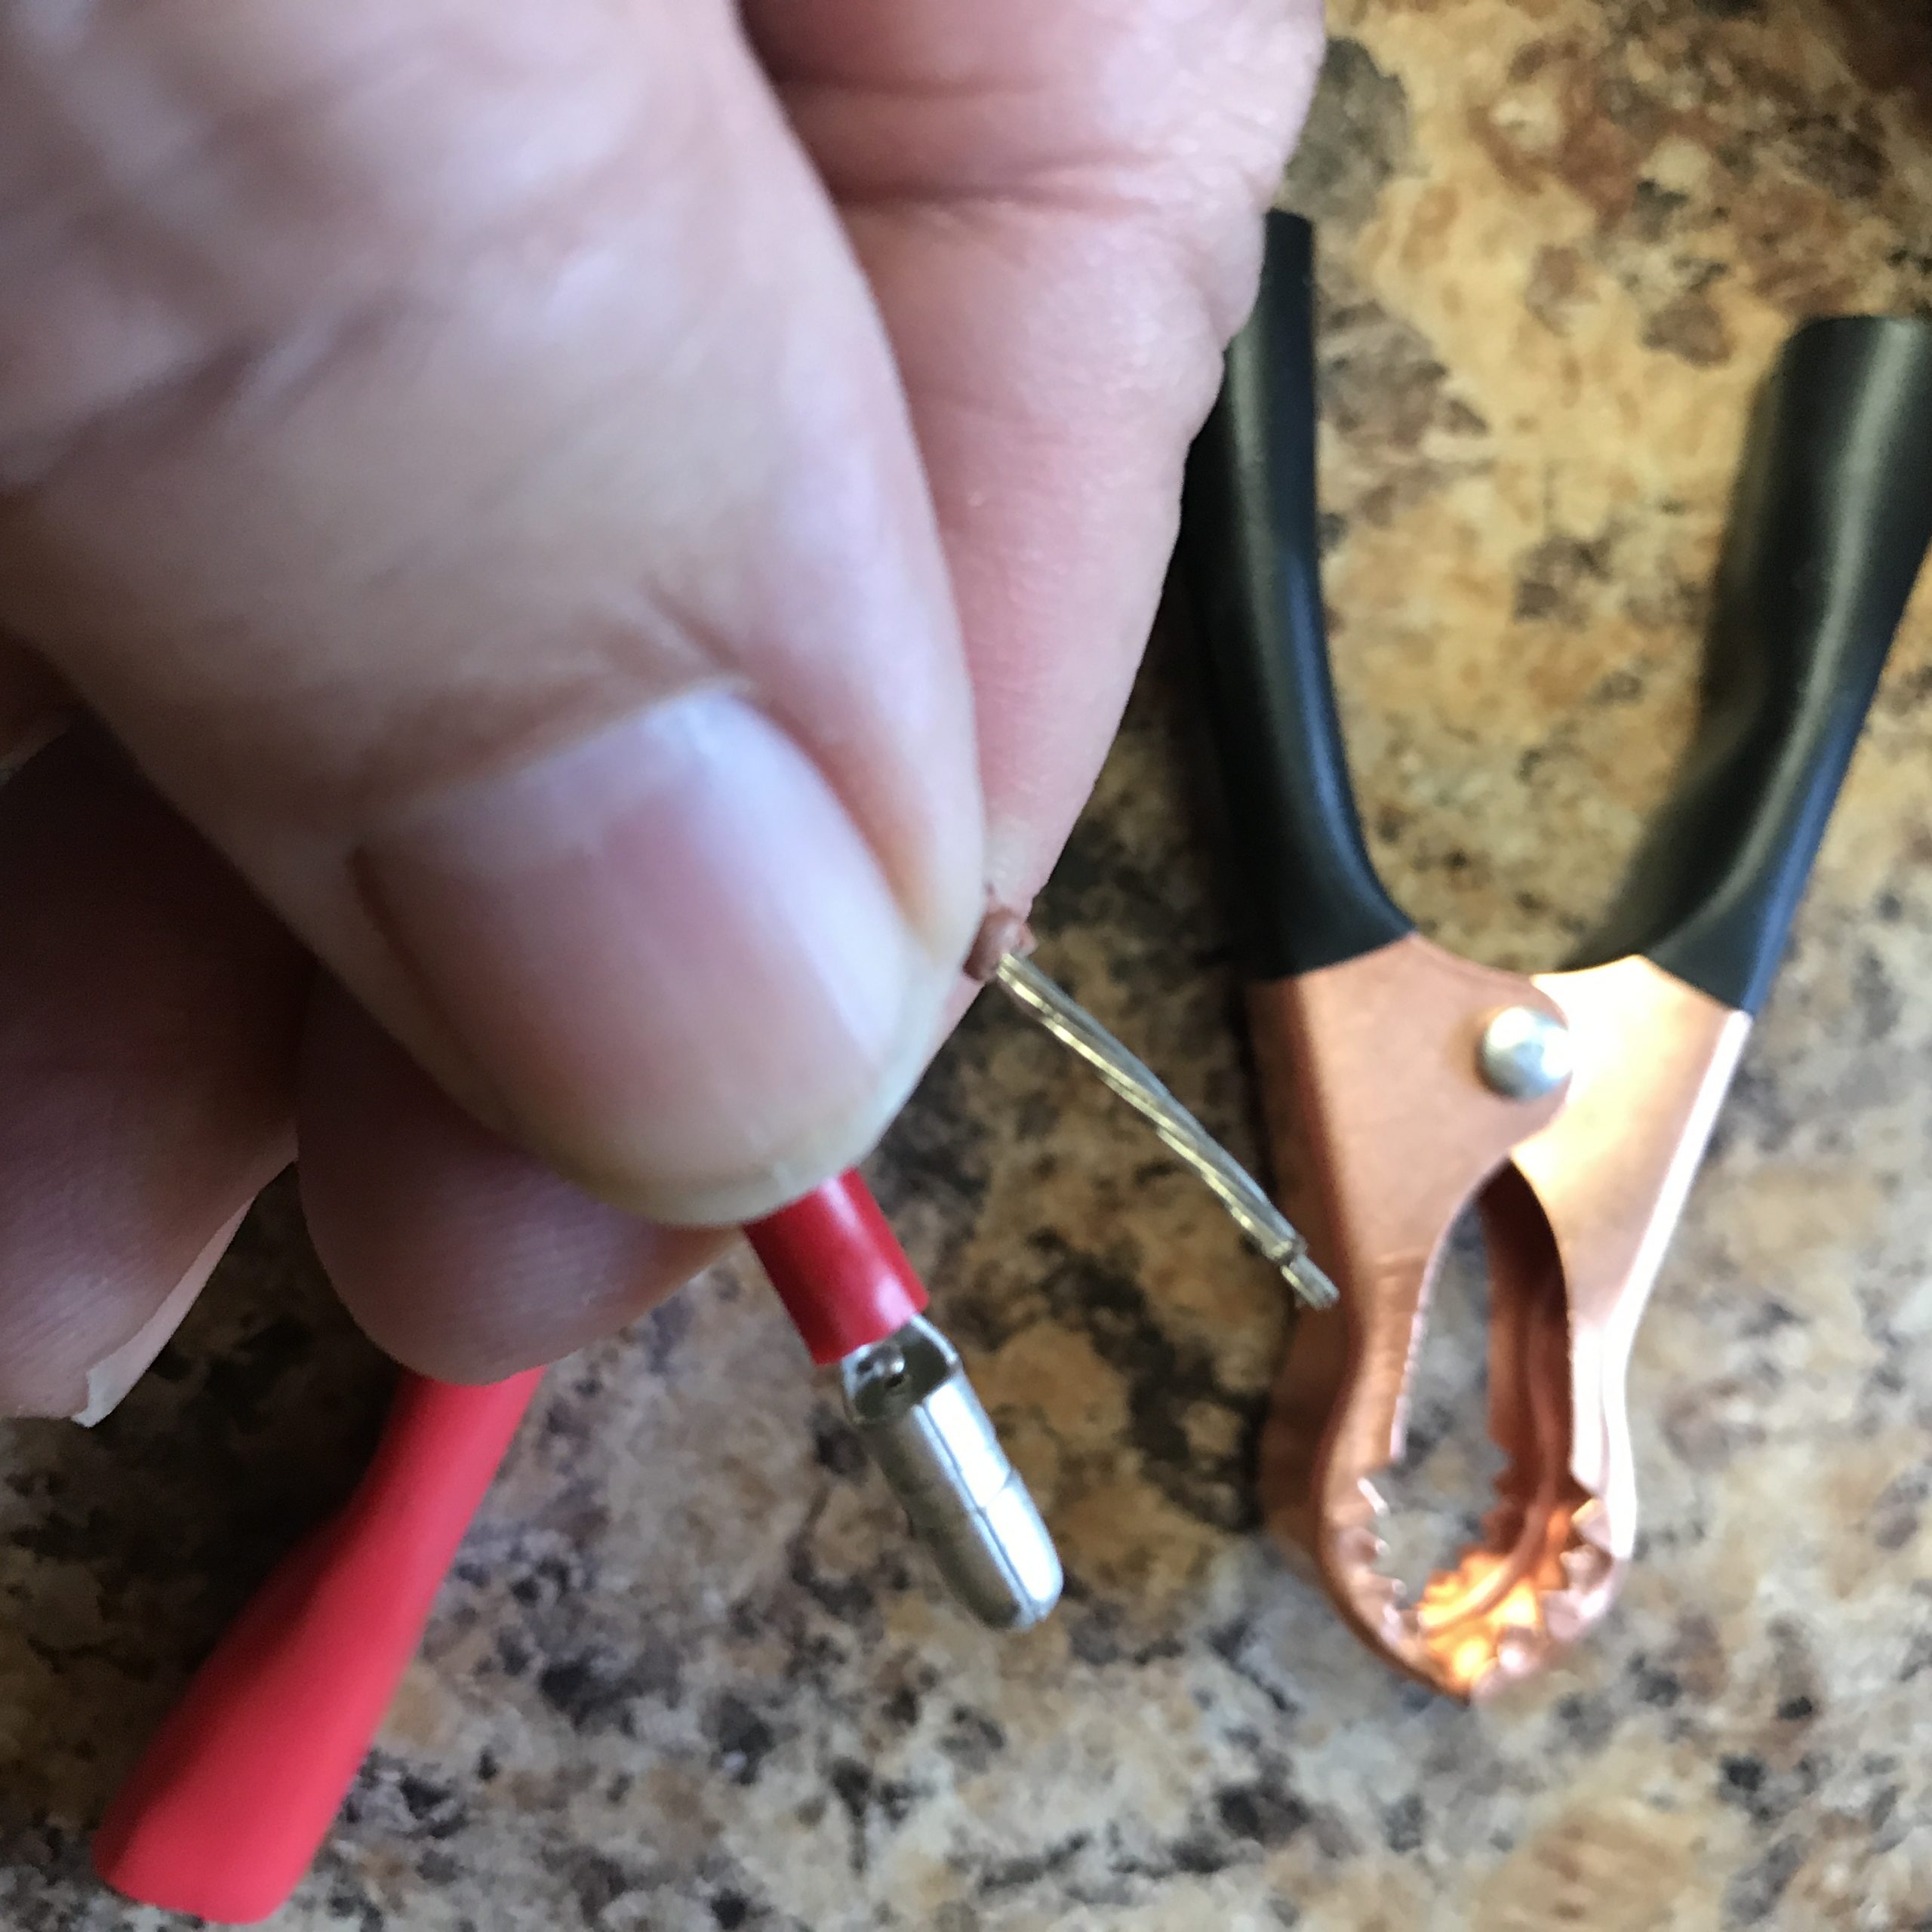
Most people won’t have a problem with the machine itself but rather with connecting the bilge pump electrical wires to the supplied battery clips. I have dealt with this problem many, many times when hooking up different batteries to different pumps.
In the two next photos, note the difference in size between a lead wire and the the battery clamp wire holder. Small battery clamps are all like this. This wire clamp holder may naturally accommodate 10 or 12 gauge wire whereas the bilge wire is somewhere between 18 and 22. Clamping now will not hold, this small diameter wire will always slip out. What to do?
Soldering isn’t the main choice here as soldering provides little mechanical strength to a connection. Its main purpose is to provide a solid electrical connection. It provides little resistance to tugging and pulling. You could fashion a strain loop for the leads but these would hang up on something in the field.
Soldering helps prevent corrosion on bare wire better than a strict mechanical connection. It may help prevent a short but it is far from a guarantee.
I’ve made hundreds of low voltage wire connections that were direct buried with no soldering. The preferred method was bringing two or more wires into a small, two part plastic canister filled with waterproof gel. The wires were first crimped together using the connector shown at the bottom of the page while slightly outside of the first half of the canister. After connecting, the second half of the canister was pressed home into the first half. Thus, you had a waterproof rated connection that was electrically and mechanically sound. See the bottom of this page. This discussion is an aside about permanent connections. But that is not what this post is about.
What we have here is a temporary connection. It uses a clamp and post system which cannot be made waterproof since it is temporary. A case surrounding the battery and its clamps is the only way to bring some protection against water. Back to the real subject of this post, fitting dissimilar wire sizes. — — —
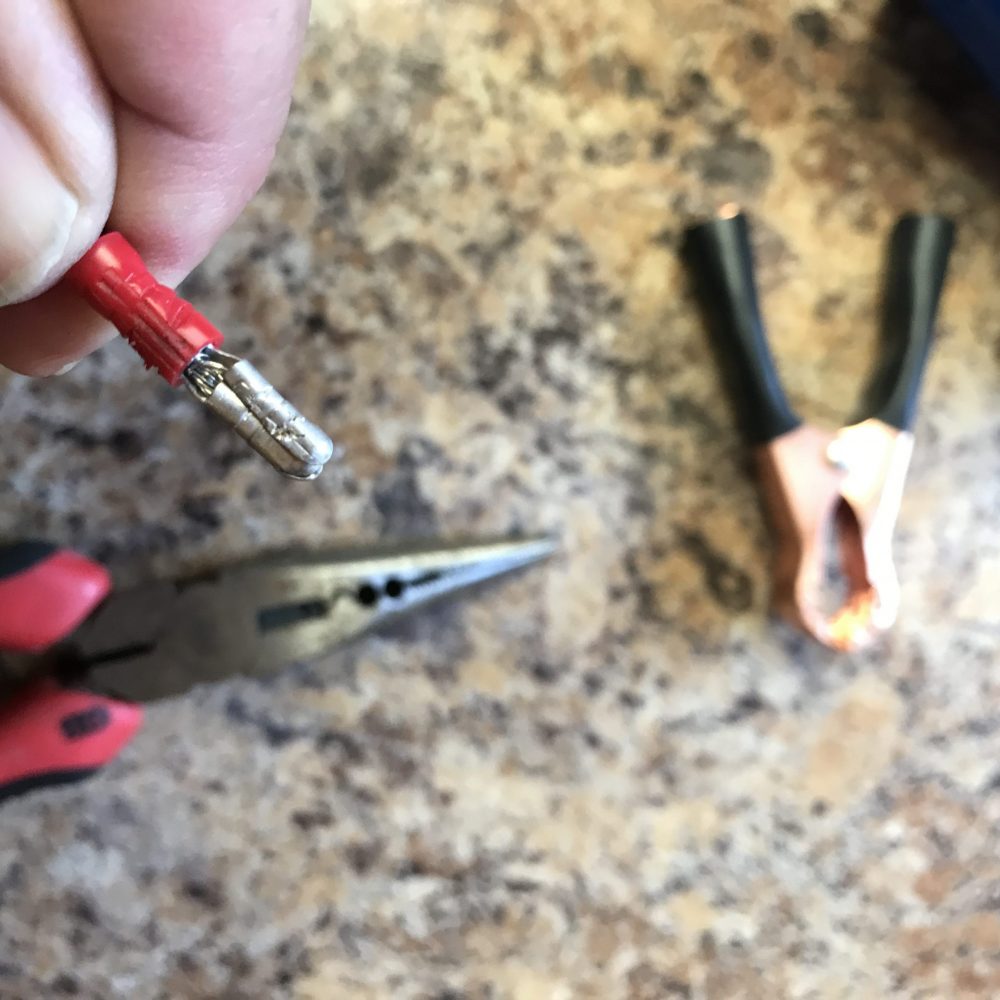
The solution is to insert the lead into a bullet splice connector, crush that against the lead, and then insert the bullet connector into the battery clamp wire holder. — The lead wire in the photo below has been crushed into the bullet splice connecter. Home Depot sells the brand made by GB or Gardner Bender. .156 diameter, 22-16 AWG. Ten to a packet and less than two dollars. —
Now insert the lead into the clamp holder. Note the tabs which must be folded onto the bullet connector and then made good by clamping with a pliers. Make sure to have the clamp’s rubber cover ahead of the wire before clamping. Let me explain.
See that red handle cover? That’s there for easy gripping of the clamp. There’s another one for the other side. It’s been pulled back to facilitate all of this connecting. Make sure it is somewhere before the wire before clamping down, otherwise you can’t get it back over the handle. This applies, too, to any shrink wrap tubing which I will discuss later. —
The photo below shows the tabs closed over the bullet connector, then clamped down. The connection is now mechanically and electrically sound. —
To keep the plastic handle cover from slipping off, I have used several turns of electrical tape to go from the cover to the lead wire. This is very ugly and unprofessional.
Ideally, you would use electrical shrink wrap tubing to marry up handle cover to the wire below. I don’t have a heat gun, however, so this will have to do.
Remember, this electrical tape has nothing to do with any electrical connection. This is just securing plastic to plastic. Electrical tape should never be used by itself to make an electrical connection. Shrink tubing would look better and work better.
Beyond this discussion is a case enclosing the battery and its clamps when you are in wet weather. Waterproofing the wire connection of the clamp does little when the post itself is exposed to rain or water. Any exposed part of an electrical circuit may cause that circuit to short when exposed to water. The entire arrangement instead must be protected. If nothing else, throw a bag over everything if it starts to rain. Better yet, get a proper case. If you are working near corrosive sea water, well, you need to get familiar with marine applications.
Here’s an alternative if you want to buy 100 of these connectors at a time. This is an electrical crimp connector. About 1/3 of an inch long. — — First, expose about 1″ of lead wire with a wire cutter to remove the wire’s outer jacketing. Next, pass that one inch through and double back one half inch on top of the crimp connector. Compress the heck out of the connector, with half of the wire still outside. Insert the crimp connector into the battery clamp connector and crush again by pressing the tabs against the connector. Don’t have the exposed wire on the tab side, place the wire underneath. This spot offers the best chance metal to metal contact.
The reason this approach works well is because the wire is hooked over and back on the crimp connector. No easy way to pull out since the wire is doubled back on itself. In theory, the bullet method could let a wire be pulled straight out. Yet I have not ever had that happened. Compression works. Anyway, many ways to skin the proverbial cat.
Updates to follow as I continue setting up the Gold Cube. — Part Two here ->
—
One last note on making waterproof connections. You need a properly designed and rated connector. You cannot simply make a pigtail splice, solder it and then place it in the ground or in the water. That is insane. Solder does not waterproof. I’ve dug up more soldered connections than I can count. Usually wrapped in electrical tape. Madness. Do you think the Bell System worked this way? Take a look at the image below. This is a quality low voltage connector. Higher voltages demand other kind of connectors. Anything marked direct burial will work in the face of water. Everything else fails. Oh, maybe not now, but it will fail. Don’t set up you and your equipment for failure.
—
Updates to follow as I continue setting up the Gold Cube. — Part Two here ->
— https://www.instagram.com/tgfarley/ Follow me on Instagram: tgfarley